Automating Tailscale exit nodes on AWS

It is useful to get into your home network when you're out and about, and many people run a VPN server for this. I use tailscale, a SaaS tool that extends wireguard. Wireguard is a modern peer-to-peer VPN, and arose in large part as an answer to the incredible accumulated complexity of things like OpenVPN and ipsec. Because wireguard is peer-to-peer, no central point intermediates all of the traffic, but the configuration complexity can be higher - all those links need to be setup.
Tailscale helps with this - it provides a central panel you can use to setup and link up your tailscale-based network ("tailnet"). It's free up to 20 devices, easy to wire up, and saves messing about with endpoint discovery. It uses the userspace wireguard implementation which is slower on Linux - there's a native kernel module - but for my use case it's plenty fast. Although i'm using it in a traditional, hub-and-spoke fashion - roaming devices access services from a central point - you can do much jazzier things as well (peer to peer microservices running wherever!) but i'll save that for a later post.
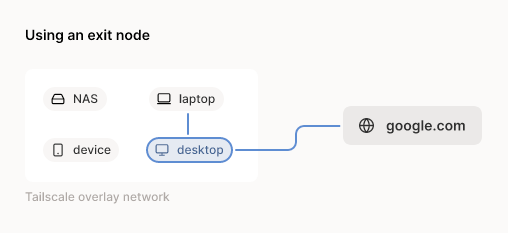
In addition to the core wireguard peer-to-peer routing, tailscale lets you setup exit nodes, which is what i'm focusing on today. Other nodes in the tailnet can then use these as a default gateway, funneling all of their traffic through the exit node and out to its attached networks and internet.
It's often helpful to have traffic geoIP to a particular region, and having multiple exit nodes scattered about lets me easily use my existing tailnet to pick where I want my traffic to appear from. You can do the same thing with a commercial VPN, but in this case I care more about extending my existing networking infrastructure and less about anonymity.
As something of an AWS enthusiast I've decided to run my exit nodes using EC2. Using AWS' CDK infrastructure-as-code tool to manage the infrastructure makes it quick and easy to setup, and to quickly extend to new regions. If we only use a single t3.micro instance, we can also stay within the AWS free tier!
Here's how.
Create CDK App
First we need a CDK app to work with.
# Install the CDK CLI if you don't already have it
💻 ➜  npm install -g aws-cdk
# Create our CDK app
💻 ➜  mkdir tailscale-exit-nodes
💻 ➜  cdk init app --language typescript
The code for this example application can also be found on github at scottgerring/tailscale-exitnodes-cdk.
Update the Stack
Next we use the CDK to describe how our instance is built. A stack is a collection of AWS resources that we can instantiate multiple times. I'll use this one to launch exit nodes into whichever AWS regions I'd like to be able to pass traffic out of.
import * as cdk from 'aws-cdk-lib';
import { CloudFormationInit, InitCommand, InitFile, Instance, InstanceType, IpAddresses, MachineImage, OperatingSystemType, SubnetType, UserData, Vpc } from 'aws-cdk-lib/aws-ec2';
import { Construct } from 'constructs';

export interface ExitNodeProps extends cdk.StackProps {
  tailscaleAuthKey: string,
  exitNodeName: string
}

export class TailscaleExitnodesCdkStack extends cdk.Stack {

  constructor(scope: Construct, id: string, props: ExitNodeProps) {
    super(scope, id, props);

    // Create a VPC for our node to live in
    const vpc = new Vpc(this, 'TheVPC', {
      ipAddresses: IpAddresses.cidr('10.0.0.0/16'),
      natGateways: 0,
      subnetConfiguration: [
        {
          cidrMask: 24,
          name: 'tailscale',
          subnetType: SubnetType.PUBLIC,
        },
      ]
    })

    // Drop our node into the public subnet to keep things simple (and save needing NAT!)
    const publicSubnets = vpc.selectSubnets({
      subnetType: SubnetType.PUBLIC
    });

    // Get the latest ubuntu 22.04 machine image
    const machineImage = MachineImage.fromSsmParameter(
      '/aws/service/canonical/ubuntu/server/jammy/stable/current/amd64/hvm/ebs-gp2/ami-id',
    );

    // We use userdata to bootstrap the machine into our tailnet
    const userData = UserData.forLinux()
    userData.addCommands(
      // Enable ip forwarding
      "echo 'net.ipv4.ip_forward = 1' | sudo tee -a /etc/sysctl.conf",
      "echo 'net.ipv6.conf.all.forwarding = 1' | sudo tee -a /etc/sysctl.conf",
      "sysctl -p /etc/sysctl.conf",

      // Install tailscale
      "curl -fsSL https://tailscale.com/install.sh | sh",
      `tailscale up --authkey ${props.tailscaleAuthKey} --advertise-exit-node --hostname=${props.exitNodeName}`
    );

    // Create our exit node
    const instance = new Instance(this, "exitNode", {
    // use t3.micro - one of these fits within the AWS free tier each month
      instanceType: new InstanceType("t3.micro"),
      vpc: vpc,
      instanceName: props.exitNodeName,
      vpcSubnets: publicSubnets,
      machineImage: machineImage,
      userData: userData
    });
  }

}
Instantiate the stack per-region
I'd like exit nodes in Switzerland (eu-central-2) and Australia (ap-southeast-2). Our CDK app can launch the stack defined above into each of these regions with helper function plumbing the configuration together.
#!/usr/bin/env node
import 'source-map-support/register';
import * as cdk from 'aws-cdk-lib';
import { TailscaleExitnodesCdkStack, ExitNodeProps } from '../lib/tailscale-exitnodes-cdk-stack';

const app = new cdk.App();

const tailscaleAuthKey = process.env.TAILSCALE_AUTH_KEY!

const stackForRegion = function(id: string, region: string, exitNodeName: string) {
  return new TailscaleExitnodesCdkStack(app, id, {
    tailscaleAuthKey,
    exitNodeName,
    env: {
      region: region
    }
  })
}

const stacks = [
  stackForRegion('ExitNodesStackSydney', 'ap-southeast-2', "TSSydneyExitNode"),
  stackForRegion('ExitNodesStackZurich', 'eu-central-2', "TSZurichExitNode")
];
Obtain a Tailscale Auth Key and deploy
In the app configuration shown above, you might have noticed a reference to the environment variable TAILSCALE_AUTH_KEY. Auth keys let us provision tailscale nodes without needing the interactive login flow, which is perfect for our use case here. We can create one from the console, jam it into the environment for our shell, and then deploy our app to both regions.
💻 ➜ export TAILSCALE_AUTH_KEY=tskey-auth-123456789
💻 ➜ cdk deploy --all
Once the app is deployed, we should see both exit nodes in the tailscale machines console.

Note the "?" next to the "Exit Node" label - we need to edit the node's route settings and enable it's use as an exit node before we can use it as suggested by the tooltip.

Wrap Up
Once we've done this, we simply pick the exit node we want from Tailscale's UI on the machine we want to send traffic from, and we're done! We can also add more regions - just add another call to stackForRegion in the app typescript file above. To delete everything, run cdk destroy --all from the CDK project.